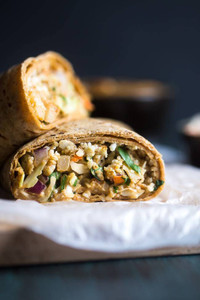
Thai Pineapple Fried Rice
Cookie & KateRecipe
Thai Pineapple Fried Rice
Author: Cookie and Kate
Recipe type: Entree
Cuisine: Asian
Prep time: 15 mins
Cook time: 10 mins
Total time: 25 mins
Serves: 2 to 4 servings
Thai-style sweet and spicy pineapple fried rice with red bell pepper, cashews and cilantro. This is a healthy and quick, vegetarian weeknight dinner! This dish comes together very quickly, so be sure to have your ingredients prepped and located near the stove before you start cooking. Chilled leftover rice works best in stir fries because it doesn't clump together, so cook the rice in advance if time allows (see recipe notes). Recipe yields 2 large, restaurant-sized portions or 4 more modest portions.
INGREDIENTS
- 2 tablespoons coconut oil or quality vegetable oil, divided
- 2 eggs, beaten with a dash of salt
- 1½ cups chopped fresh pineapple
- 1 large red bell pepper, diced
- ¾ cup chopped green onions (about ½ bunch)
- 2 cloves garlic, pressed or minced
- ½ cup chopped raw, unsalted cashews
- 2 cups cooked and chilled brown rice*, preferably long-grain brown jasmine rice
- 1 tablespoon reduced-sodium tamari or soy sauce
- 1 to 2 teaspoons chili garlic sauce or sriracha
- 1 small lime, halved
- Salt, to taste
- Handful of fresh cilantro leaves, torn into little pieces, for garnishing
INSTRUCTIONS
- Heat a large wok, cast iron skillet or non-stick frying pan over medium-high heat and place an empty serving bowl nearby. Once the pan is hot enough that a drop of water sizzles on contact, add 1 teaspoon oil. Pour in the eggs and cook, stirring frequently, until the eggs are scrambled and lightly set, about 30 seconds to 1 minute. Transfer the eggs to the empty bowl. Wipe out the pan if necessary with a paper towel (be careful, it's hot!).
- Add 1 tablespoon oil to the pan and add the pineapple and red pepper. Cook, stirring constantly, until the liquid has evaporated and the pineapple is caramelized on the edges, about 3 to 5 minutes. Then add the green onion and garlic. Cook until fragrant while stirring constantly, about 30 seconds. Transfer the contents of the pan to your bowl of eggs.
- Reduce the heat to medium and add the remaining 2 teaspoons oil to the pan. Pour in the cashews and cook until fragrant, stirring constantly, about 30 seconds. Add the rice to the pan and stir to combine. Cook until the rice is hot, stirring occasionally, about 3 minutes.
- Pour the contents of the bowl back into the pan and stir to combine, breaking up the scrambled eggs with your spoon. Cook until the contents are warmed through, then remove the pan from heat. Add the tamari and chili garlic sauce, to taste. Squeeze the juice of ½ lime over the dish and stir to combine. Season to taste with salt and set aside.
- Slice the remaining ½ lime into 4 wedges. Transfer the stir-fry to individual serving bowls and garnish each bowl with a lime wedge and a light sprinkle of cilantro. Serve with bottles of tamari and chili garlic sauce or sriracha on the side, for those who might want to add more to their bowls.
NOTES
Recipe adapted from my spicy kale and coconut stir fry.
*RICE NOTES: For 2 cups cooked rice, you'll need to cook up about ⅔ cup dry rice. To cook the rice, rinse it well in a fine mesh colander, then bring a large pot of water to boil. Add the rice and let it boil, uncovered, for 30 minutes. Drain off the remaining cooking water, then return the rice to the pot. Cover the pot and let the rice steam, off the heat, for 10 minutes. To chill the rice ASAP, spread it across a parchment paper-lined rimmed baking sheet and let it cool in the refrigerator.
MAKE IT VEGAN/EGG FREE: Skip the eggs by heating the pan and then start cooking with step 2. This fried rice would be great with crispy baked tofu, which you could toss in during step 4.
MAKE IT GLUTEN FREE: Make sure to use a certified gluten-free soy sauce (tamari is usually gluten free, but check to be sure).
STORAGE SUGGESTIONS: The dish tastes great the next day, whether reheated or served at room temperature.
IF YOU LOVE THIS RECIPE: Be sure to check out my other Thai-inspired recipes here!
UPDATE 10/18/2016: I uploaded better photos of this recipe, so it might look a little different (and hopefully a lot more appealing). :)


